This is the second part of my attempt to control Filtrete Wifi thermostat with Alexa. In the first part, I showed you how to connect various components together, short of writing any code. At the end of this part you should be able to ask Alexa for the current temperature. Now let's write some JavaScript!
First, this is how my Node-RED GUI looks like at the end:
 |
| Final workflow in Node-RED GUI |
There are two thermostats in the above workflow, Upstair and Downstair, each supporting two functions: getting current temperature and setting a target temperature. These two thermostats have the same workflow except the URL of the thermostats they are controlling. I will go through each node in the workflow in detail below.
The Alexa Home Node
You start by dragging an
alexa home node, found under the alexa section of the palette, onto the canvas. Double-click on it to bring up a dialog window and fill up required information, like shown in the screenshot below. For the Account field, enter the account you signed up at the skill's companion website by clicking on the little pencil button next to it. Once you do that, the Device drop-down will get populated with the list of thermostats you defined on the companion website (if not, click on the refresh button next to it to force a reload). You need to select one of them. Uncheck the Auto Acknowledge field (we are going to code the acknowledgement). The Topic field is optional. |
| The Alexa Home node |
The Switch node
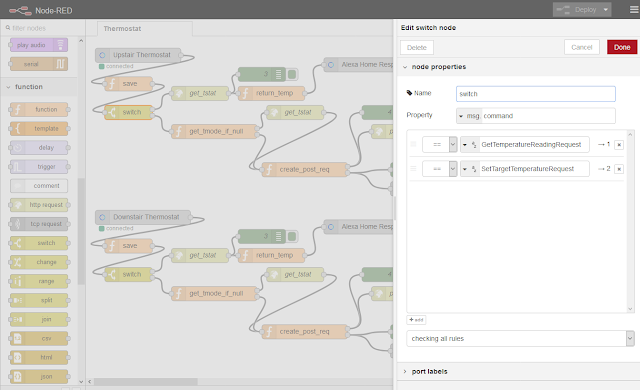
The next node you are creating is the
switch node, found in the function section of the palette. (I will discuss the save node between them in a second.) The switch node's job is to send Alexa commands to the correct branch based on its type. In this case, the switch is based on the value of msg.command, and two branches are created - GetTemperatureReadingRequest and SetTargetTemperatureRequest. |
| The Switch node |
The get_tstat HTTP Request node
Let's first make Alexa tell the current temperature. This is the upper branch coming out of the
switch node. Remember in Part 1 we've set up the IP address of the thermostat and demonstrated getting its current status through a web browser. (The technical details are specified in the Filtrete thermostat API documentation here.) Now, drag to the canvas an http request node, found in the input section of the palette. Set the Method field to GET, the URL field to [IP_ADDRESS_OF_THERMOSTAT]/tstat, the Return field to a parsed JSON object.  |
| The get_tstat HTTP Request node |
The (green) Debug node
The
debug node, found in the output section of the palette, act like little probes that can be inserted into anywhere in the workflow. It can print out any property of the msg object that you specify. In this case, insert one after get_tstat node and have it print out msg.payload, so you can see exactly what's been returned from the thermostat. To view the debug messages, click on the "3-bar" drop-down menu on the top right-hand corner -> View -> Debug messages. |
| The Debug node |
The return_temp Function node
Now you need to extract the temperature from the output of the
get_tstat node above, and prepare a response (i.e acknowledgement) to Alexa. Drag to the canvas a function node found under the function section of the palette. Change its function content to the following:
// cache the thermostat's operating mode (heat or cool)
if (context.global.data.tmode === null)
{
    context.global.data.tmode = msg.payload.tmode;
}
// Filtrete always returns Fahrenheit, but we should always respond to Alexa in Celcius.
// Alexa will automatically convert it into Fahrenheit later on if user prefers so.
var curr_temp = (msg.payload.temp-32)*5/9;

msg.extra = {
    "temperatureReading": {
        "value": Math.round(curr_temp * 10)/10, // round to 1 decimal
        "scale": "CELCIUS"
    },
    "applianceResponseTimestamp": new Date().toISOString()
};
msg.payload = true;
return msg;
The Alexa Home Resp node
The response carrying the current temperature is ready to be sent back to Alexa. Drag to the canvas an
alexa home resp node found in the alexa section of the palette. There is nothing to be set for this node - simply connect it to the previous node.Go ahead, ask Alexa for the current temperature!
At this point, the work for getting current temperature is complete (short of the
save function node which is not required at this moment). You should chain all the nodes created above as shown in the screenshot at the top. Then click on the red Deploy button on the top right-hand corner. If deployment is successful, you should see a green dot followed by "connected" under the first node. Now, go ahead and ask Alexa: "Alexa, what is Upstair's temperature?".Couple of observations:
- You will actually see your command being worked by the workflow - the
get_tstatnode will show a blue dot and the text "requesting" underneath it while it is performing the HTTP GET request on the thermostat. The built-in webserver of the thermostat isn't very performant, so these requests can take seconds - thus you can see it. Which brings us to the point below:
- Sometimes you hear Alexa respond with "Hmm, the Upstair thermostat isn't responding". This happens when the thermostat is slow to perform the HTTP GET request. I haven't yet figured out how to increase the timeout on Alexa's side.
To be continued ... Proceed to Part 3/3


We stumbled over here from a different web address and thought I might check things out. I like what I see so i am just following you. Look forward to looking over your web page for a second time.
ReplyDeletezehnder charleston radiator
VERY INFORMATIVE ARTICLE. Thanks
ReplyDeletecosmopolitanmechanical.ca
ERY INFORMATIVE ARTICLE. Thanks
ReplyDeletecosmopolitanmechanical.ca