Wednesday, March 7, 2018

Using Google App Script and Google Sheets to create a class sign-up system

G Suite and Google App Script

I've been learning to use G Suite and Google Apps Script lately. G Suite is a neat little platform that, among other things, allows you to create simple web applications without knowing how to program. For example, you can create an online survey using Google Forms and capture survey results automatically in Google Sheets. What's really cool, however, is that Google Apps Script allows you to connect these G Suite applications (Forms, Sheets, Email, etc) to create something even more powerful. Even better, it is free!

A Class Sign-up System

I created a class sign-up system as part of my learning process. Imagine you are a group tutoring agency offering weekend classes, and you need a web application that allows prospective students to sign up for these classes. The system has the following features:
  • shows prospective students how many others have already signed up for a particular time slot
  • sends confirmation email, with an iCal event attached, once a student submits the sign up form
  • uses Google Sheets as a datastore for storing class information and enrollment information
  • runs entirely on Google ecosystem, free of charge
  • allows customizable UI (for example, using Zurb Foundation 6 for styling and VueJS for front-end interaction). It bears no resemblance at all to a Google Form or Google Sheet app (Sorry Google ;-))
Below are screenshots of the main page and the sign-up page
Main Page
Sign-up Page
As you can see, the interface bears no resemblance at all to a Google Form or Google Sheets application. In fact, I used Zurb Foundation 6 for styling and VueJS for front-end interaction.

The Code

All code is on my github here.

Caveat

Though my experience with Apps Script is mostly positive, I don't quite like the restrictions (aka IFRAME Sandbox mode) that are enforced on the HTML page served by Apps Script. The restrictions are detailed here. For example, I can't navigate to a new page in place - I must always open a new window. I also can't use Javascript on the new window to close itself. Very annoying, but perhaps done for security reasons.

Thursday, March 1, 2018

Use of localtime(), localtime_r() and their performance implications

It's about time

I recently troubleshooted a multi-threaded program suffering from performance issues. Specifically, threads that were suppposed to be busy spinning and clocking 100% CPU were only doing about 30%. It turns out that call to localtime() is the culprit, and the problem is resolved by replacing it with localtime_r().

I wrote a small test program to illustrate the scale of the problem. The program creates 3 threads, each of which is pinned to a CPU core and calls localtime() or localtime_r() 100K times. The latter is more than 4x faster. Here is the code and output:


vagrant@ubuntu-xenial:/vagrant_data/temp$ time ./localtime 
thread exiting ...
thread exiting ...
thread exiting ...
main exiting... 

real 0m0.894s
user 0m0.384s
sys 0m0.724s

vagrant@ubuntu-xenial:/vagrant_data/temp$ time ./localtime _r
thread exiting ...
thread exiting ...
thread exiting ...
main exiting... 

real 0m0.193s
user 0m0.264s
sys 0m0.112s


The Investigation


It was puzzling why localtime() was so much slower compared to its thread-safe version. Indeed, if you look at the man page excerpt of localtime() and localtime_r() below, it doesn't seem to suggest so. In fact, the observation that localtime_r() runs faster seemed counter-intuitive at first - shouldn't the thread-safe version run a bit slower than it's non-thread-safe brother due to the added serialization? (Granted, thread safety is achieved through the use of a user-provided, instead of a global, result buffer).


The localtime() function converts the calendar time timep to broken-down time representation, expressed relative to the user's specified timezone. The function acts as if it called tzset(3) and sets the external variables tzname with information about the current timezone, timezone with the difference between Coordinated Universal Time (UTC) and local standard time in seconds, and daylight to a nonzero value if daylight savings time rules apply during some part of the year. The return value points to a statically allocated struct which might be overwritten by subsequent calls to any of the date and time functions. The localtime_r() function does the same, but stores the data in a user-supplied struct. It need not set tzname, timezone, and daylight.


The answer, of course, lies in the source code! Both functions call __tz_convert(), which is the source of the problem. Here are the source code: localtime.c and tzset.c.
First, there is a critical section in __tz_convert() protected by a mutex (__libc_lock). Who'd have thought that!


  __libc_lock_lock (tzset_lock);
 
  /* Update internal database according to current TZ setting.
     POSIX.1 8.3.7.2 says that localtime_r is not required to set tzname.
     This is a good idea since this allows at least a bit more parallelism.  */
  tzset_internal (tp == &_tmbuf && use_localtime);
 
  if (__use_tzfile)
    __tzfile_compute (*timer, use_localtime, &leap_correction,
                      &leap_extra_secs, tp);
  else
    {
      if (! __offtime (timer, 0, tp))
        tp = NULL;
      else
        __tz_compute (*timer, tp, use_localtime);
      leap_correction = 0L;
      leap_extra_secs = 0;
    }
 
  __libc_lock_unlock (tzset_lock);


Second, the critical section calls a function tzset_internal(), which is quite expensive. localtime_r() calls this function only once, but localtime() calls it every time. In the code snippet below, the always flag is true for localtime(), but false for localtime_r().


/* Interpret the TZ envariable.  */
static void
tzset_internal (int always)
{
  static int is_initialized;
  const char *tz;
 
  if (is_initialized && !always)
    return;
  is_initialized = 1;
  
  ...
  ...
}


At this point, it is easy to see why localtime() runs slow - more code being executed, and why thread's CPU usage drops significantly - longer critical section leading to more contention. Looking back at the man page description, it hinted that localtime_r() "need not set tzname, timezone, and daylight".

Lesson learnt


Latency-sensitive multi-threaded applications may want to do away with localtime_r() entirely due to the use of mutex. If timezone conversion is needed, the application can call localtime_r() once upon initialization to obtain local time T0, and subsequently call the much cheaper time() again to obtain a delta, then apply the delta to T0.

Sunday, January 14, 2018

Control Filtrete Wifi Thermostat with Alexa  -  Part 3 of 3

This is Part 3 of the tutorial on how to use Alexa to control a Filtrete Wifi thermostat, which doesn’t offer an official Alexa skill. In Part 1, I covered how to set up a Node-RED server on Raspberry Pi, install the Node-RED skill and link up the thermostat in Alexa. In Part 2, I covered how to read current temperature of the thermostat. In this last part of the tutorial I'm going to show you how to set target temperature on the thermostat.

Keep State - 1

The Filtrete Wifi thermostat operates in two modes: Heat and Cool. To set the target temperature, the API states that you must also specify the mode of operation. You can get the current mode from get_tstat - it is the tmode field in the returned JSON structure, as shown in Part 2 of the tutorial.
So, instead of calling get_tstat to get operating mode every time we set target temperature, we do this only once and cache its value. To check if a value has been cached, we look into the context.global variable in Node-RED. This is basically what the get_tmode_if_null node does.
The get_tmode_if_null node
Below is the code of the get_tmode_if_null node. Note that this node has two output slots. If tmode is not present in context.global.data, the first slot is selected, otherwise the second slot is selected. The first slot is linked to a get_tstat node, which is identical to the one we explained in Part 2.

// 'get_tmode_if_null' node

if (context.global.data.tmode === null)
{
    return [[msg],null];
}
else
{
    return [[], msg];
}

Keep State - 2

In the above setup, if tmode is not found in the cache, get_tstat will be called. When this happens, the original msg object that carries the target temperature get destroyed and is replaced by the result of the get_tstat. To get around this, we save the target temperature before doing anything else. This is basically what the save node does. Similarly, when we eventually finish setting the target temperature and report success to Alexa, we need to supply the original request back to Alexa. For this reason, we also need to cache the original request msg. Below is the code of the save node.

// 'save' node

context.global.data = context.global.data || {};
context.global.data.msg = msg;
if (!isNaN(msg.payload))
{
    context.global.data.target = msg.payload;
}
return msg;

Assemble a HTTP POST Request

Now, we have all the necessary ingredients to set a target temperature on the thermostat. This is what create_post_req does. Note that this node receives its input from two possible sources - the get_tstat node if we need to get the current operating mode, or the get_tmode_if_null node otherwise. Also note that this node has two output slots - the first one for sending the assembled request to the thermostat, and the second for reporting an error to Alexa if requested target temperature is out of range. Finally, note that this is the place where we save the current operating mode to context.global.data. Let's take a look at the code first:

// 'create_post_req' node

if (context.global.data.tmode === null)
{
    context.global.data.tmode = msg.payload.tmode;
}

var tmode = context.global.data.tmode;
var target = context.global.data.target;

if (target < 10 || target > 25) {
    var range = {
        min: 10.0,
        max: 25.0
    };
    msg.payload = false;
    msg.extra = range;
    
    return [[],msg];
}

target = Math.round(target * 9/5 + 32);
var ret;
switch (tmode)
{
    case 1:
        ret = {payload: {tmode:tmode, t_heat:target}};
        break;
    case 2:
        ret = {payload: {tmode:tmode, t_cool:target}};
        break;
    default:
        ret = {payload: {tmode:tmode, t_heat:target}};
        break;
}

return [[ret], null]
Remember, Alexa works with Celsius internally, so the target temperature received in the request is always in Celsius. First, we make sure the new target temperature is within a pre-defined range - in this case, my range is from 10 degree Celsius to 25 degree Celsius. Then, we convert the temperature to Fahrenheit required by the thermostat. Finally, we create the request payload with two variables - tmode and t_heat or t_cool.
If the target temperature is out of range, we return the response to Alexa immediately. To do this, we attach an alexa home resp to the second slot of the create_post_req node.

Post Request to Thermostat

Create an http request node, set the Method to POST and URL to [THERMOSTAT_IP_ADDRESS]/tstat. Then connect it to the first output slot of the create_post_req node.
The post_tstat node

Return success to Alexa

Create a function node with the following code:

// 'return_result' node

if (msg.payload.success === 0)
{
    var success = RED.util.cloneMessage(context.global.data.msg);
    success.payload = true;
    success.extra = {
        targetTemperature: {
            value: context.global.data.target
        }
    }
    return success;
}
else
{
    return null;
}
We then attach an alexa home resp to the output slot of the return_result node. to complete the flow.
The return_result node

The End

Remember to hit the Deploy on top of the Node-RED GUI to deploy your changes. Now, you can ask Alexa to set a target temperature on your Filtrete Wifi theromostat!
That's it! I hope you enjoyed reading this tutorial.

Tuesday, January 2, 2018

Control Filtrete Wifi Thermostat with Alexa  -  Part 2 of 3

This is the second part of my attempt to control Filtrete Wifi thermostat with Alexa. In the first part, I showed you how to connect various components together, short of writing any code. At the end of this part you should be able to ask Alexa for the current temperature. Now let's write some JavaScript!
First, this is how my Node-RED GUI looks like at the end:
Final workflow in Node-RED GUI
There are two thermostats in the above workflow, Upstair and Downstair, each supporting two functions: getting current temperature and setting a target temperature. These two thermostats have the same workflow except the URL of the thermostats they are controlling. I will go through each node in the workflow in detail below.

The Alexa Home Node

You start by dragging an alexa home node, found under the alexa section of the palette, onto the canvas. Double-click on it to bring up a dialog window and fill up required information, like shown in the screenshot below. For the Account field, enter the account you signed up at the skill's companion website by clicking on the little pencil button next to it. Once you do that, the Device drop-down will get populated with the list of thermostats you defined on the companion website (if not, click on the refresh button next to it to force a reload). You need to select one of them. Uncheck the Auto Acknowledge field (we are going to code the acknowledgement). The Topic field is optional.
The Alexa Home node

The Switch node

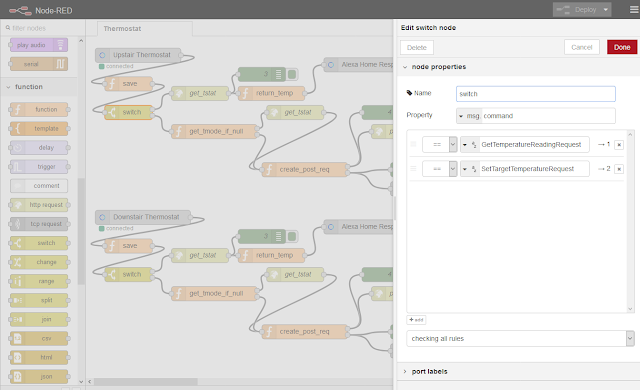
The next node you are creating is the switch node, found in the function section of the palette. (I will discuss the save node between them in a second.) The switch node's job is to send Alexa commands to the correct branch based on its type. In this case, the switch is based on the value of msg.command, and two branches are created - GetTemperatureReadingRequest and SetTargetTemperatureRequest.
The Switch node

The get_tstat HTTP Request node

Let's first make Alexa tell the current temperature. This is the upper branch coming out of the switch node. Remember in Part 1 we've set up the IP address of the thermostat and demonstrated getting its current status through a web browser. (The technical details are specified in the Filtrete thermostat API documentation here.) Now, drag to the canvas an http request node, found in the input section of the palette. Set the Method field to GET, the URL field to [IP_ADDRESS_OF_THERMOSTAT]/tstat, the Return field to a parsed JSON object.
The get_tstat HTTP Request node

The (green) Debug node

The debug node, found in the output section of the palette, act like little probes that can be inserted into anywhere in the workflow. It can print out any property of the msg object that you specify. In this case, insert one after get_tstat node and have it print out msg.payload, so you can see exactly what's been returned from the thermostat. To view the debug messages, click on the "3-bar" drop-down menu on the top right-hand corner -> View -> Debug messages.
The Debug node

The return_temp Function node

Now you need to extract the temperature from the output of the get_tstat node above, and prepare a response (i.e acknowledgement) to Alexa. Drag to the canvas a function node found under the function section of the palette. Change its function content to the following:

// cache the thermostat's operating mode (heat or cool)
if (context.global.data.tmode === null)
{
    context.global.data.tmode = msg.payload.tmode;
}
// Filtrete always returns Fahrenheit, but we should always respond to Alexa in Celcius.
// Alexa will automatically convert it into Fahrenheit later on if user prefers so.
var curr_temp = (msg.payload.temp-32)*5/9;

msg.extra = {
    "temperatureReading": {
        "value": Math.round(curr_temp * 10)/10, // round to 1 decimal
        "scale": "CELCIUS"
    },
    "applianceResponseTimestamp": new Date().toISOString()
};
msg.payload = true;
return msg; 

The Alexa Home Resp node

The response carrying the current temperature is ready to be sent back to Alexa. Drag to the canvas an alexa home resp node found in the alexa section of the palette. There is nothing to be set for this node - simply connect it to the previous node.

Go ahead, ask Alexa for the current temperature!

At this point, the work for getting current temperature is complete (short of the save function node which is not required at this moment). You should chain all the nodes created above as shown in the screenshot at the top. Then click on the red Deploy button on the top right-hand corner. If deployment is successful, you should see a green dot followed by "connected" under the first node. Now, go ahead and ask Alexa: "Alexa, what is Upstair's temperature?".
Couple of observations:
  1. You will actually see your command being worked by the workflow - the get_tstat node will show a blue dot and the text "requesting" underneath it while it is performing the HTTP GET request on the thermostat. The built-in webserver of the thermostat isn't very performant, so these requests can take seconds - thus you can see it. Which brings us to the point below:
  2. Sometimes you hear Alexa respond with "Hmm, the Upstair thermostat isn't responding". This happens when the thermostat is slow to perform the HTTP GET request. I haven't yet figured out how to increase the timeout on Alexa's side.
To be continued ... Proceed to Part 3/3

Monday, January 1, 2018

Control Filtrete Wifi Thermostat with Alexa  -  Part 1 of 3

I got an Echo Dot for Christmas and I was eager to use it to control my two Filtrete Wifi Thermostats (model 3M-50) in the house. Turns out it’s harder than I thought. Unlike Nest or Honeywell thermostats, Filtrete doesn’t have an official Alexa skill. Fortunately, after several hours of googling and tinkering, I was able to put together a way to do that using open-source software (kudos to Ben Hardill’s work which is a major piece to the puzzle). Ready for the details? Here we go!
The Filtrete thermostat I have at home

What you will need

  • an Echo device
  • a Raspberry Pi running Raspbian Jessie or above
  • a Filtrete Wifi Thermostat (from what I could tell, the following models are supported: CT-80 Rev A v2.18, CT-30e v1.75, 3M-50 v1.09, and CT-80 Rev B v1.00 and later versions)

TL;DR

Install Node-RED on Raspberry Pi. Install Node-RED module node-red-contrib-alexa-home-skill. Create an account on this module’s companion website and define thermostats there. Install Node-RED Alexa skill and account-link using the account created above, and have Alexa discover the thermostats. Study the thermostat’s API here. Write a Node-RED flow to control the thermostat. Now, ask Alexa to control the thermostat!

Setting up Node-RED on Raspberry Pi

First, install Node-RED on a Raspberry Pi. Node-RED is a platform that allows you to write work flows to control IoTs devices using a Scratch-like interface. This is actually the first time I came across the Node-RED project and I must say, after a few days of working on this project, I’m quite impressed by how polished and powerful it is.
Follow the official instruction here to install Node-RED on Raspberry Pi. Apparently, Raspbian Wheezy is not supported. I still had Wheezy on my Pi, but couldn’t seem to find a way to reliably upgrade it Jessie, so I just did a clean install of the latest version called Stretch. Other than that, the installation process is pretty straight-forward. Make sure you set it to auto-start on boot (details in the same instruction page).
Once finished, start Node-RED server like this:

pi@pi-2:~ $ node-red-start
Start Node-RED
 
Once Node-RED has started, point a browser at http://192.168.1.15:1880
On Pi Node-RED works better with the Firefox or Chrome browser
 
Use   node-red-stop                          to stop Node-RED
Use   node-red-start                         to start Node-RED again
Use   node-red-log                           to view the recent log output
Use   sudo systemctl enable nodered.service  to autostart Node-RED at every boot
Use   sudo systemctl disable nodered.service to disable autostart on boot
 
To find more nodes and example flows - go to http://flows.nodered.org
 
Starting as a systemd service.
Started Node-RED graphical event wiring tool..
26 Dec 06:14:30 - [info]
Welcome to Node-RED
===================
26 Dec 06:14:30 - [info] Node-RED version: v0.17.5
26 Dec 06:14:30 - [info] Node.js  version: v6.12.2
26 Dec 06:14:30 - [info] Linux 4.9.59+ arm LE
26 Dec 06:14:36 - [info] Loading palette nodes
26 Dec 06:15:07 - [info] Settings file  : /home/pi/.node-red/settings.js
26 Dec 06:15:07 - [info] User directory : /home/pi/.node-red
26 Dec 06:15:07 - [info] Flows file     : /home/pi/.node-red/flows_pi-2.json
26 Dec 06:15:07 - [info] Creating new flow file
26 Dec 06:15:07 - [info] Server now running at http://127.0.0.1:1880/

Now, point your browser to http://[YOUR-RASPBERRY-PI-IP-ADDRESS]:1880/ and you should see a nice-looking GUI like this:
The Node-RED GUI
Now, install the node-red-contrib-alexa-home-skill module. You can do this directly in the GUI: in the drop-down menu on the top right corner (next to the red Deploy button), click on ‘Manage palette’, and then click on the ‘Install’ tab in the popup window. Search for node-red-contrib-alexa-home-skill and install it, like this:
Installing the node-red-contrib-alexa-home-skill module
Now you should have two Alexa nodes at the bottom of the palette on the left-hand side, like this:
New Alexa nodes

Setting up Alexa

You need to describe the thermostats you’d like to control. At the minimum, you should give them names, and specify the types of commands to be used. You do this on the Node-RED module’s companion website here. It has a documentation page which provides very detailed instructions on what to do. My setup looks like this:
Defining the thermostats
Now, enable the Node-RED Alexa skill for your Echo device (do this on your phone or tablet’s Amazon Alexa app, like you would any other skills). After enabling, the skill would prompt you to link the account you just created on the companion website. Once account is linked, ask Alexa to discover the thermostats you defined above, by saying Alexa, discover devices. You should see the thermostats now listed under the ‘Smart Home’ section of the app.
The Node-RED Alexa skill

Setting up the Thermostats

The main goal here is to make sure your home router assigns static IP addresses to the thermostats, aka giving them a DHCP Static Lease. In my Verizon router, this is done in the “Advanced” - “IP address distribution” page. This ensures that the IP addresses of the thermostats do not change over time. Take note of the IP addresses so we can use them in the next section.
One of my thermostats’ IP address and DHCP Static Lease configuration
To confirm if you’ve got the correct IP address, point your browser to http://[YOUR-THERMOSTAT-IP]/tstat. You should see the thermostat returning its current status in the form of a JSON object, like this:
JSON object returned from one of the thermostats
Read the API documentation here to see what other functionalities are available.

Writing the Node-RED flow (FUN begins!)

All the plumbing work is completed at this point, and now we need to write the brain that controls the thermostats, in the form of a Node-RED flow.
Here is the top-level sequence of events after you tell Alexa to set a thermostat’s temperature: Echo forwards the voice command to Amazon cloud where it is processed and recognized as a request to change (a particular) thermostat’s temperature -> Amazon recognizes that this thermostat was discovered from the Node-RED skill -> Amazon sends the request to the companion website, along with your ID -> companion website forwards the request to the Node-RED server running on your Raspberry Pi (via MQTT?). What should happen next, but is currently missing, is that the Node-RED server would then instruct the thermostat to change its target temperature, and send back the result of the change, which would traverse the above route in reverse to reach your Echo device. This is what we need to write next.
Ben Hardill, the person behind most of the work that links Alexa to Node-RED, has provided detailed instructions on how to write flows using the Alexa nodes installed above. His instructions were very helpful in getting me started, but I had to add/change things quite a bit due to the idiosyncrasies of the Filtrete thermostat.
In the second and third part, I will show you my Node-RED flow/code that queries the current temperature, and then the code that sets a target temperature.
To be continued ...

Link to Part 2/3 of this tutorial

Saturday, August 1, 2009

I am an old-fashioned geek

A lot to say, too little time. So much to desire, yet so lost. So sit down, be quiet, and enjoy your inner emptiness (or discover inner happiness) ...

Using Google App Script and Google Sheets to create a class sign-up system

G Suite and Google App Script I've been learning to use G Suite and Google Apps Script lately. G Suite is a neat little platform that, a...